Keyboard navigation is the first step in making Blockly more accessible. This guide focuses on how to modify keyboard navigation.
What you'll learn
- How to change the behavior of a cursor.
- How to change the look of cursors and markers.
- How to add a shortcut.
- How to change the current key mappings.
What you'll build
- A cursor that displays a red blinking image over the block.
- A cursor that skips over previous and next connections.
- A keyboard shortcut for moving the cursor to the top of a stack.
What you'll need
- Basic understanding of blocks and toolboxes in Blockly.
- NPM installed (instructions).
- Comfort using the command line/terminal.
- Familiarity with the blockly keyboard navigation documentation.
This codelab will demonstrate how to install the keyboard navigation plugin on top of the Blockly sample app and then add code to create and use a custom Cursor and Marker.
The application
Use the npx @blockly/create-package app command to create a standalone application that contains a sample setup of Blockly, including custom blocks and a display of the generated code and output.
- Run
npx @blockly/create-package app keyboard-navigation-codelab. This will create a blockly application in the folderkeyboard-navigation-codelab. cdinto the new directory:cd keyboard-navigation-codelab.- Install the keyboard navigation plugin:
npm install @blockly/keyboard-navigation --save - Run
npm startto start the server and run the sample application. - The sample app will automatically run in the browser window that opens.
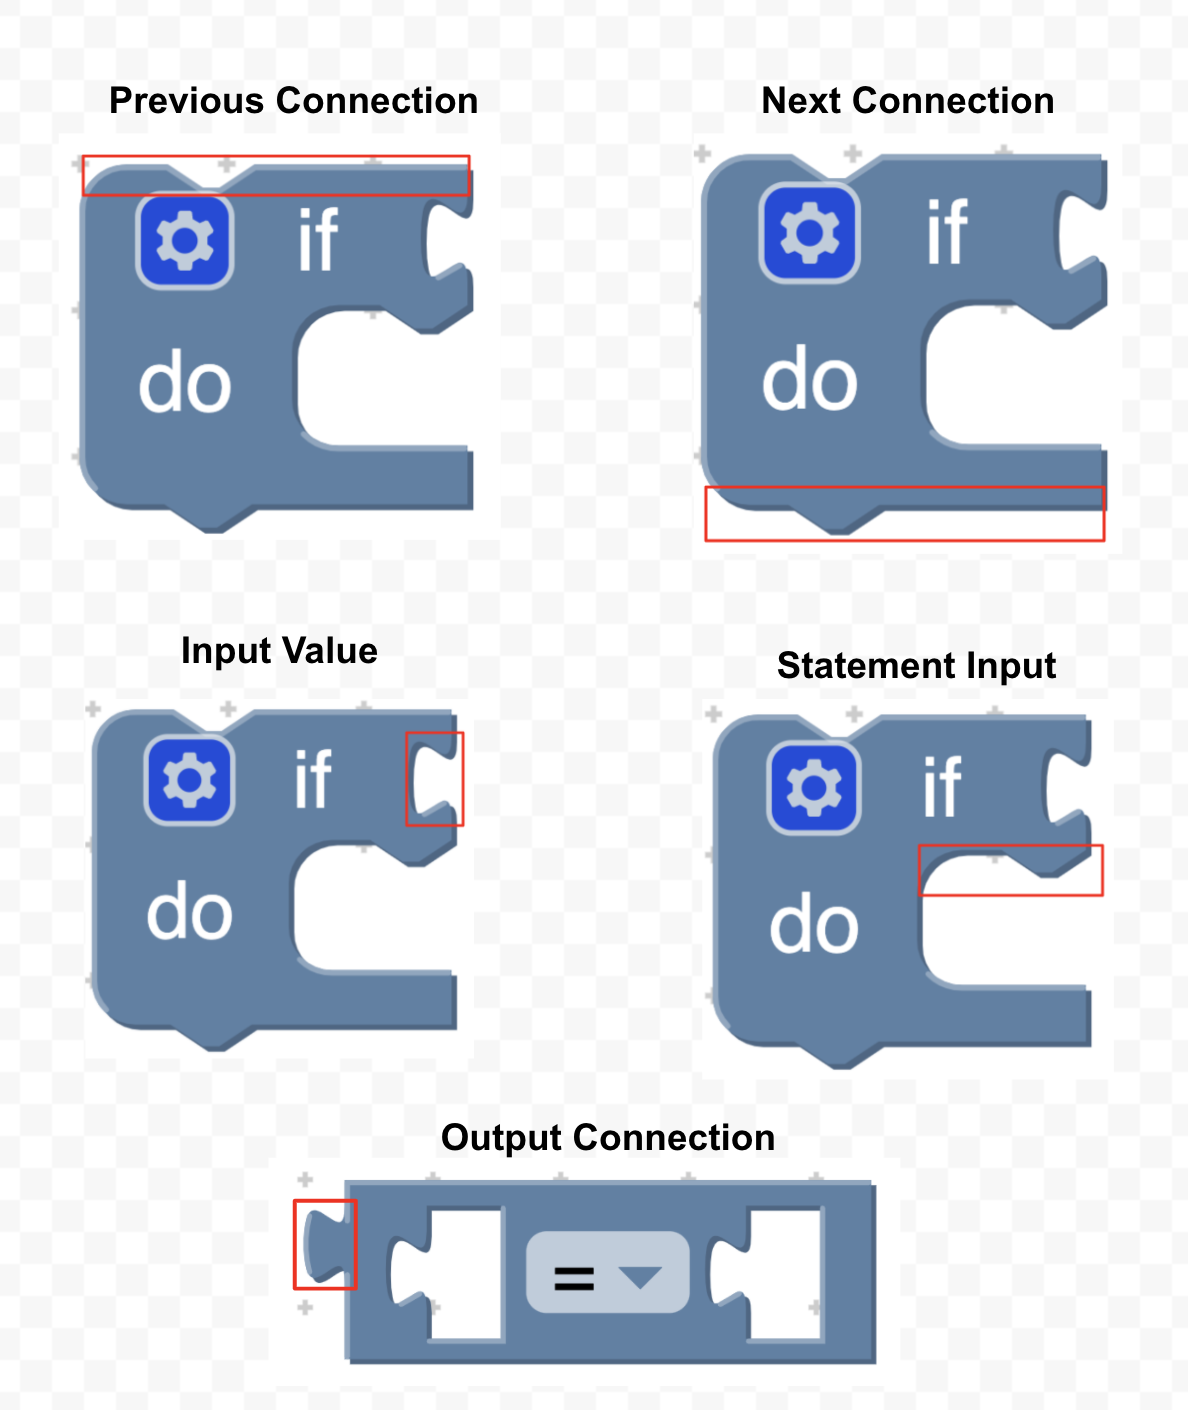
A Marker holds a location and is not movable. A marker is used to mark a location on the workspace, such as marking the spot where the user can drop a block from the toolbox.
A Cursor is a marker that can move. It extends a Blockly.Marker but adds logic to allow the marker to move through the blocks, inputs, fields, connections and workspace coordinates.
The below image displays different parts of a block that a user can navigate to using keyboard navigation.
First, import and set up a NavigationController in index.js. NavigationController is the class in charge of registering all keyboard shortcuts.
Import NavigationController at the top of index.js:
import {NavigationController} from '@blockly/keyboard-navigation';
Then, somewhere after the existing code that injects the workspace, create an instance of NavigationController, initialize it, and add it to the workspace:
// Initialize NavigationController plugin and add to our workspace.
const navigationController = new NavigationController();
navigationController.init();
navigationController.addWorkspace(ws);
At this point, the app will have default keyboard navigation enabled. Pressing ctrl + shift + k will enter the user into keyboard navigation mode. From here, WASD style commands can be used to navigate around. Further details can be found in the blockly keyboard navigation documentation.
Blockly organizes all the different components in a workspace in a structured way by representing them as an abstract syntax tree (AST).
The following image displays the AST for a workspace.
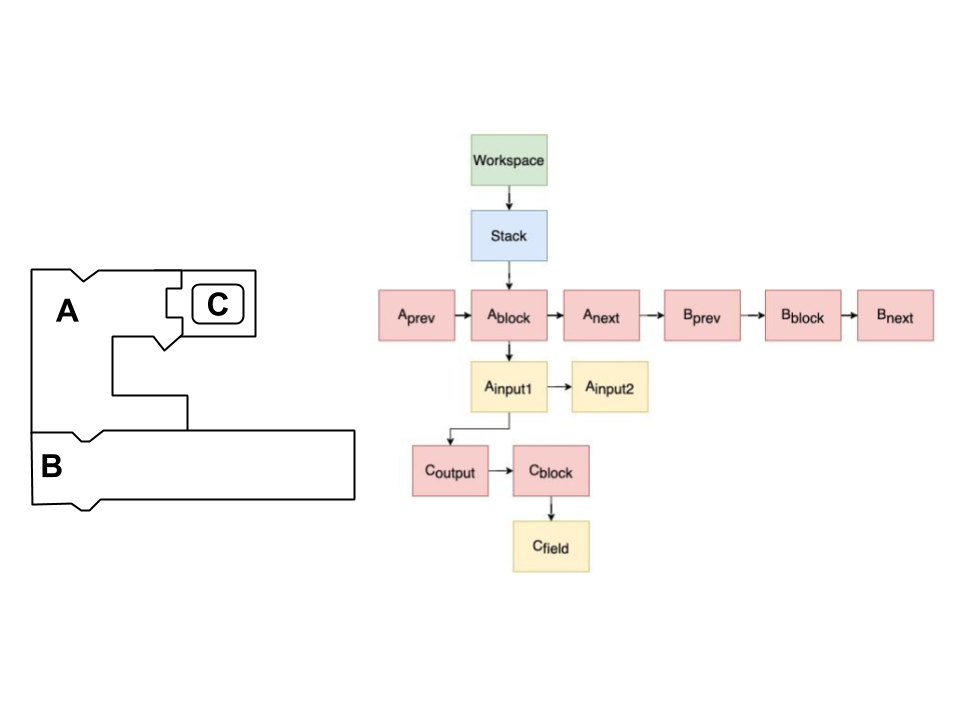
There are four different levels to the AST:
- Workspace Level (green): Holds all workspace nodes.
- Stack Level (blue): Holds all stack nodes.
- Block and Connection Level (red): Holds all block and connection nodes.
- Field and Input Level (yellow): Holds all field and input nodes.
For a more detailed explanation of the different levels please see the keyboard navigation documentation.
Create AST nodes
The Blockly.ASTNode class is used to represent the AST. The Blockly.ASTNode class holds a workspace component. This component can be a block, connection, field, input or workspace coordinate.
The following code shows how to create a Blockly.ASTNode for the different workspace components:
const workspaceNode = Blockly.ASTNode.createWorkspaceNode(
    workspace, wsCoordinate);
const stackNode = Blockly.ASTNode.createStackNode(topBlock);
const connectionNode = Blockly.ASTNode.createConnectionNode(connection);
const blockNode = Blockly.ASTNode.createBlockNode(block);
const fieldNode = Blockly.ASTNode.createFieldNode(field);
const inputNode = Blockly.ASTNode.createInputNode(input);
Use AST nodes
These nodes are used in the cursor to decide where to go and what to draw.
Every node can:
- Return the node below it (
in()) - Return the node above it (
out()) - Return the previous node (
prev()) - Return the next node (
next())
For example, the following code can be used to get the stack node from a workspace node:
const stackNode = workspaceNode.in();
The Blockly.blockRendering.MarkerSvg class contains the logic to draw cursors and markers. It decides what to draw depending on the current node the cursor or marker holds.
To start, create a new directory at src/markers and add a file inside named custom_marker_svg.js.
At the top of the file, import blockly/core:
import * as Blockly from 'blockly/core';
Then define a new custom marker and have it extend Blockly.blockRendering.MarkerSvg:
class CustomMarkerSvg extends Blockly.blockRendering.MarkerSvg {
  constructor(workspace, constants, marker) {
    super(workspace, constants, marker);
  }
}
Now, inside CustomMarkerSvg, override createDomInternal_(). This method is in charge of creating all DOM elements for the marker. Add a new path element for when the cursor is on a block:
  /**
   * @override
   */
  createDomInternal_() {
    super.createDomInternal_();

    // Create the svg element for the marker when it is on a block and set the
    // parent to markerSvg_.
    this.blockPath_ = Blockly.utils.dom.createSvgElement(
        'path', {}, this.markerSvg_);

    // If this is a cursor make the cursor blink.
    if (this.isCursor()) {
      const blinkProperties = this.getBlinkProperties_();
      Blockly.utils.dom.createSvgElement('animate', blinkProperties,
          this.blockPath_);
    }
  }
Next, create a method named showWithBlock_(curNode) that will:
- Update the block path.
- Set the current marker.
- Set the parent.
- Show the current marker.
This method will be called within showAtLocation_(curNode) when the user moves to a new block:
  showWithBlock_(curNode) {
    // Get the block from the AST Node
    const block = curNode.getLocation();

    // Get the path of the block.
    const blockPath = block.pathObject.svgPath.getAttribute('d');

    // Set the path for the cursor.
    this.blockPath_.setAttribute('d', blockPath);

    // Set the current marker.
    this.currentMarkerSvg = this.blockPath_;

    // Set the parent of the cursor as the block.
    this.setParent_(block);

    // Show the current marker.
    this.showCurrent_();
  }
Then, override showAtLocation_(curNode). This method is used to decide what to display at a given node:
  /**
   * @override
   */
  showAtLocation_(curNode) {
    let handled = false;
    // If the cursor is on a block call the new method we created to draw the
    // cursor.
    if (curNode.getType() == Blockly.ASTNode.types.BLOCK) {
      this.showWithBlock_(curNode);
      handled = true;
    }

    // If we have not drawn the cursor let the parent draw it.
    if (!handled) {
      super.showAtLocation_.call(this, curNode);
    }
  }
Finally, override the hide() method:
  /**
   * @override
   */
  hide() {
    super.hide();
    // Hide the marker we created.
    this.blockPath_.style.display = 'none';
  }
Renderer setup
Override the renderer to have it use the cursor CustomMarkerSvg. For more information on customizing a renderer see the custom renderer codelab.
Add the following code to the bottom of custom_marker_svg.js, outside of the CustomMarkerSvg class definition:
class CustomRenderer extends Blockly.geras.Renderer {
  constructor(name) {
    super(name);
  }
}
Blockly.blockRendering.register('custom_renderer', CustomRenderer);
Now override the method responsible for returning the drawer for markers and cursors.
Add the following method inside the CustomRenderer class:
makeMarkerDrawer(workspace, marker) {
  return new CustomMarkerSvg(workspace, this.getConstants(), marker);
}
In order to use the custom renderer, it has to be imported at the top of index.js.
import './markers/custom_marker_svg';
Then, change the call to Blockly.inject to pass the newly registered renderer named custom_renderer:
const ws = Blockly.inject(blocklyDiv, {
  toolbox: toolbox,
  renderer: 'custom_renderer',
});
Test it out
Open the sample app and drag a function block on to the workspace. Press ctrl + shift + k to enter into keyboard navigation mode. Notice how the entire block starts flashing red.
Create a new directory at src/cursors and add a file inside named custom.js.
At the top of the new file, add an import of blockly/core:
import * as Blockly from 'blockly/core';
Then define a new custom cursor and have it extend the base cursor, Blockly.Cursor:
export class CustomCursor extends Blockly.Cursor {
  constructor() {
    super();
  }
}
Import the cursor at the top of src/index.js.
import {CustomCursor} from './cursors/custom';
Somewhere after the existing code that injects the workspace, use its MarkerManager to set the new custom cursor:
// Add CustomCursor to workspace
ws.getMarkerManager().setCursor(new CustomCursor());
Override the move methods
Override the methods that move the cursor in order to skip over previous and next connections.
Add the following code to cursors/custom.js, inside the CustomCursor class definition (these implementations are just a starting point that will be improved upon in the next step):
  next() {
    // The current Blockly.ASTNode the cursor is on.
    const curNode = this.getCurNode();
    if (!curNode) {
      return null;
    }
    // The next Blockly.ASTNode.
    let newNode = curNode.next();
    if (newNode) {
      this.setCurNode(newNode);
    }
    return newNode;
  }

  in() {
    const curNode = this.getCurNode();
    if (!curNode) {
      return null;
    }
    let newNode = curNode.in();
    if (newNode) {
      this.setCurNode(newNode);
    }
    return newNode;
  }

  prev() {
    const curNode = this.getCurNode();
    if (!curNode) {
      return null;
    }
    let newNode = curNode.prev();
    if (newNode) {
      this.setCurNode(newNode);
    }
    return newNode;
  }

  out() {
    const curNode = this.getCurNode();
    if (!curNode) {
      return null;
    }
    let newNode = curNode.out();
    if (newNode) {
      this.setCurNode(newNode);
    }
    return newNode;
  }
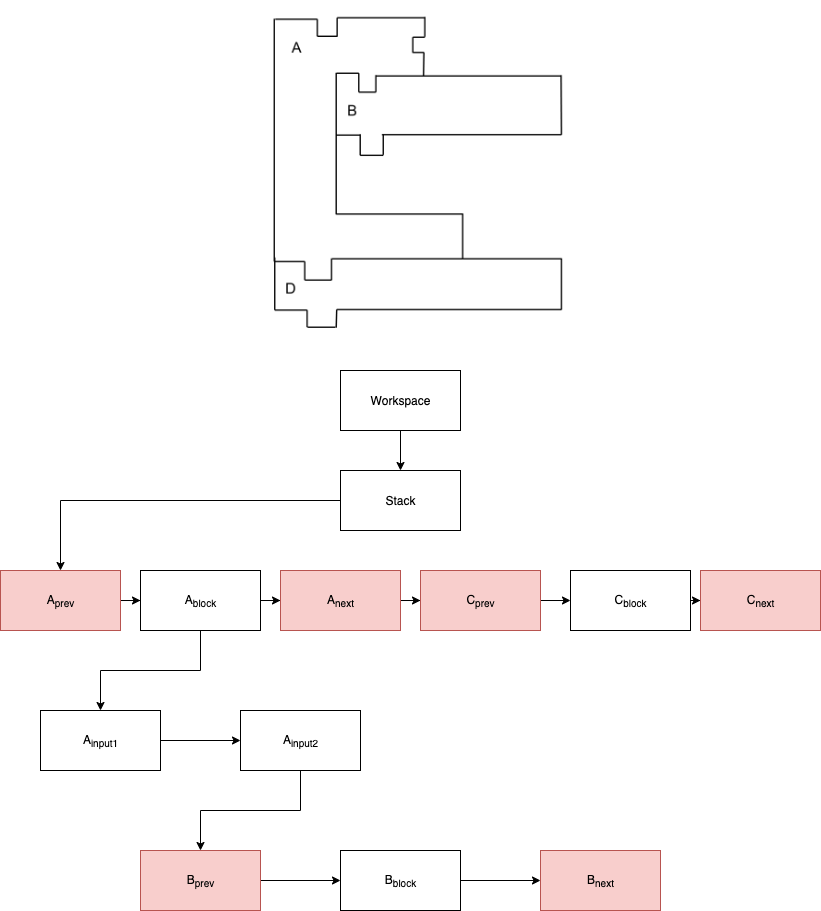
Modify the move methods
Now add logic to the move methods to skip over the previous and next connections. The following image represents the logic being added. The red boxes represent the nodes to skip.
Change the next method so it will skip over any previous or next connections and go straight to the next block:
  next() {
    const curNode = this.getCurNode();
    if (!curNode) {
      return null;
    }
    let newNode = curNode.next();
    // While the newNode exists and is either a previous or next type go to the
    // next value.
    while (newNode && (newNode.getType() === Blockly.ASTNode.types.PREVIOUS ||
        newNode.getType() === Blockly.ASTNode.types.NEXT)) {
      newNode = newNode.next();
    }
    if (newNode) {
      this.setCurNode(newNode);
    }
    return newNode;
  }
Change the prev method so it will skip over any previous or next connections and go straight to the previous block:
  prev() {
    const curNode = this.getCurNode();
    if (!curNode) {
      return null;
    }
    let newNode = curNode.prev();
    // While the newNode exists and is either a previous or next connection go
    // to the previous value.
    while (newNode && (newNode.getType() === Blockly.ASTNode.types.PREVIOUS ||
        newNode.getType() === Blockly.ASTNode.types.NEXT)) {
      newNode = newNode.prev();
    }
    if (newNode) {
      this.setCurNode(newNode);
    }
    return newNode;
  }
Change the in method so that it will skip over any previous connections and go straight to the contained block:
  in() {
    const curNode = this.getCurNode();
    if (!curNode) {
      return null;
    }
    let newNode = curNode.in();
    // If the newNode is a previous connection go to the next value in the
    // level. This will be the block.
    if (newNode && newNode.getType() === Blockly.ASTNode.types.PREVIOUS) {
      newNode = newNode.next();
    }
    if (newNode) {
      this.setCurNode(newNode);
    }
    return newNode;
  }
Test it out
Open the sample app and enter into keyboard navigation mode (ctrl + shift + k). Drag some blocks on to the workspace and navigate to the first block. From here hit the S key to go to the next block. Notice how the cursor skips over the previous and next connection and goes straight to the next block.
This section will add a shortcut that will allow users to move their cursor to the top of their current stack by pressing ctrl + W.
Create a key mapping
A key mapping connects a key code or combination of key codes to a shortcut. When the key code or combination of key codes are pressed the shortcut will run.
Primary keys can be combined with modifier keys by using the createSerializedKey() method. A list of the available modifier keys are:
Blockly.ShortcutRegistry.modifierKeys.SHIFTBlockly.ShortcutRegistry.modifierKeys.CONTROLBlockly.ShortcutRegistry.modifierKeys.ALTBlockly.ShortcutRegistry.modifierKeys.META
Create a key code for ctrl + W by adding the following code to the bottom of index.js:
// Create a serialized key from the primary key and any modifiers.
const ctrlW = Blockly.ShortcutRegistry.registry.createSerializedKey(
    Blockly.utils.KeyCodes.W, [Blockly.ShortcutRegistry.modifierKeys.Control]);
Create a shortcut
A shortcut has several properties:
name: The name of the shortcut. This must be unique.keyCodes: A list of key codes that when pressed will trigger this shortcut. This shortcut will use thectrlWdefined above.preconditionFn: A function that returns true if and only if the shortcut should be run. This shortcut will only run whenworkspace.keyboardAccessibilityModeis true.callback: A function that is called when the shortcut has been executed. This should return true if the shortcut has been handled. If a shortcut returns true, no other shortcuts with the same key mapping will be handled.
Add the following code to the bottom of index.js:
const moveToStack = {
  name: 'moveToStack',
  keyCodes: [ctrlW], // The custom key mapping.
  preconditionFn: function(workspace) {
    return workspace.keyboardAccessibilityMode;
  },
  callback: function(workspace) {
    const cursor = workspace.getCursor();
    // Gets the current node.
    const currentNode = cursor.getCurNode();
    // Gets the source block from the current node.
    const currentBlock = currentNode.getSourceBlock();
    // If we are on a workspace node there will be no source block.
    if (currentBlock) {
      // Gets the top block in the stack.
      const rootBlock = currentBlock.getRootBlock();
      // Gets the top node on a block. This is either the previous connection,
      // output connection, or the block itself.
      const topNode = Blockly.ASTNode.createTopNode(rootBlock);
      // Update the location of the cursor.
      cursor.setCurNode(topNode);
      return true;
    }
  },
};
Once the shortcut is created, it can be registered by adding the following code to the bottom of index.js:
Blockly.ShortcutRegistry.registry.register(moveToStack);
Test it out
Open the sample app and create a stack of blocks. Enter into keyboard navigation mode (ctrl + shift + k). Move the cursor down a few blocks and then press ctrl + W. Notice how the cursor jumps to the top of the stack of blocks.
This section will update key mappings so users can use the arrow keys for their cursor instead of the default WASD keys.
Before adding the key mappings below, import the shortcut names by adding the following line to the top of index.js:
import {Constants} from '@blockly/keyboard-navigation';
Now set the keys for the next, previous, in, and out actions at the bottom of index.js:
Blockly.ShortcutRegistry.registry.removeAllKeyMappings(Constants.SHORTCUT_NAMES.OUT);
Blockly.ShortcutRegistry.registry.addKeyMapping(Blockly.utils.KeyCodes.LEFT, Constants.SHORTCUT_NAMES.OUT);

Blockly.ShortcutRegistry.registry.removeAllKeyMappings(Constants.SHORTCUT_NAMES.IN);
Blockly.ShortcutRegistry.registry.addKeyMapping(Blockly.utils.KeyCodes.RIGHT, Constants.SHORTCUT_NAMES.IN);

Blockly.ShortcutRegistry.registry.removeAllKeyMappings(Constants.SHORTCUT_NAMES.PREVIOUS);
Blockly.ShortcutRegistry.registry.addKeyMapping(Blockly.utils.KeyCodes.UP, Constants.SHORTCUT_NAMES.PREVIOUS);

Blockly.ShortcutRegistry.registry.removeAllKeyMappings(Constants.SHORTCUT_NAMES.NEXT);
Blockly.ShortcutRegistry.registry.addKeyMapping(Blockly.utils.KeyCodes.DOWN, Constants.SHORTCUT_NAMES.NEXT);
Note: For a full list of the shortcuts registered in the keyboard navigation plugin see the constants file.
Test it out
Open the sample app and enter into keyboard navigation mode (ctrl + shift + k). The arrow keys can now be used to move around instead of the default WASD keys.
There is still a lot of work to be done in figuring out the best way to provide keyboard navigation support for users.
In this codelab you learned:
- How to create a new cursor.
- How to change the look of markers and cursors.
- How to add shortcuts.