What you'll learn
- How to define and register a custom renderer.
- How to override renderer constants.
- How to change the shape of connection notches.
- How to set a connection's shape based on its type checks.
What you'll build
This codelab builds and uses four renderers:
- A minimal custom renderer that extends
Blockly.blockRendering.Rendererbut makes no modifications.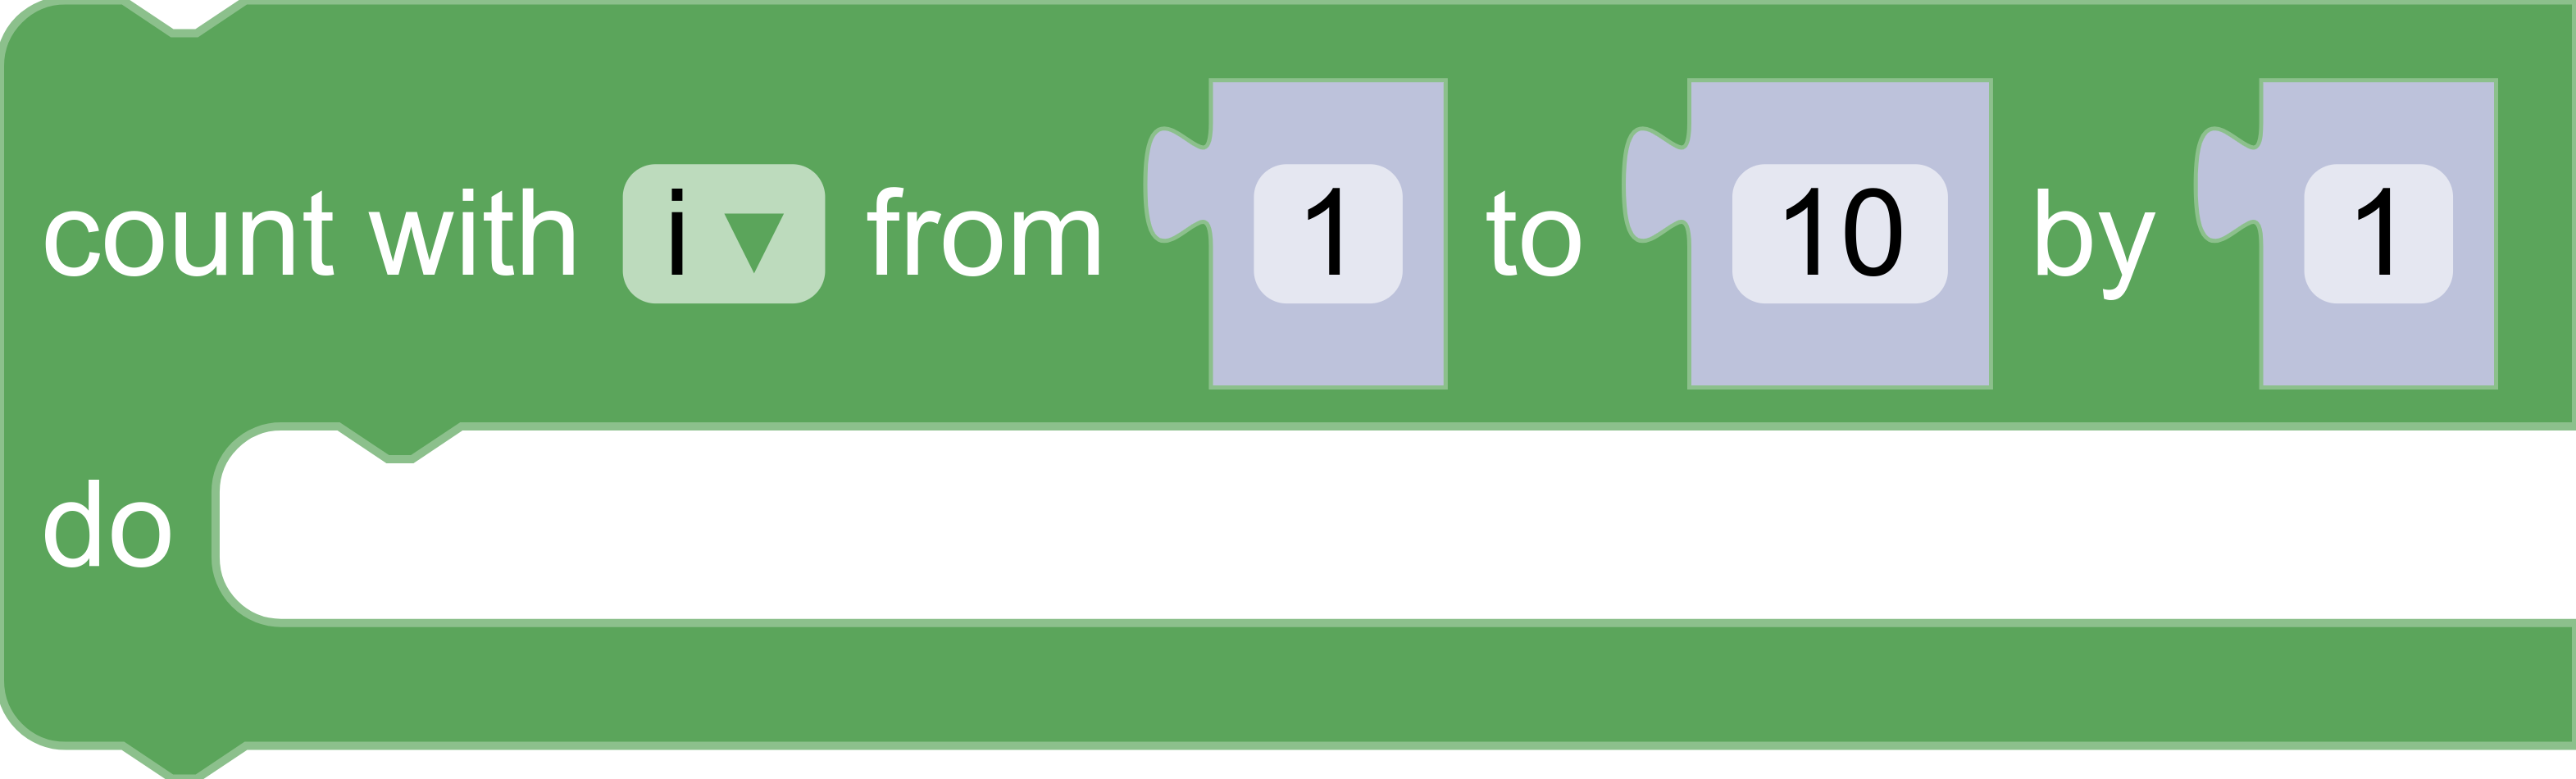
- A custom renderer which sets new values for the rendering-related constants
NOTCH_WIDTH,NOTCH_HEIGHT,CORNER_RADIUS, andTAB_HEIGHTfound inBlockly.blockRendering.ConstantProvider.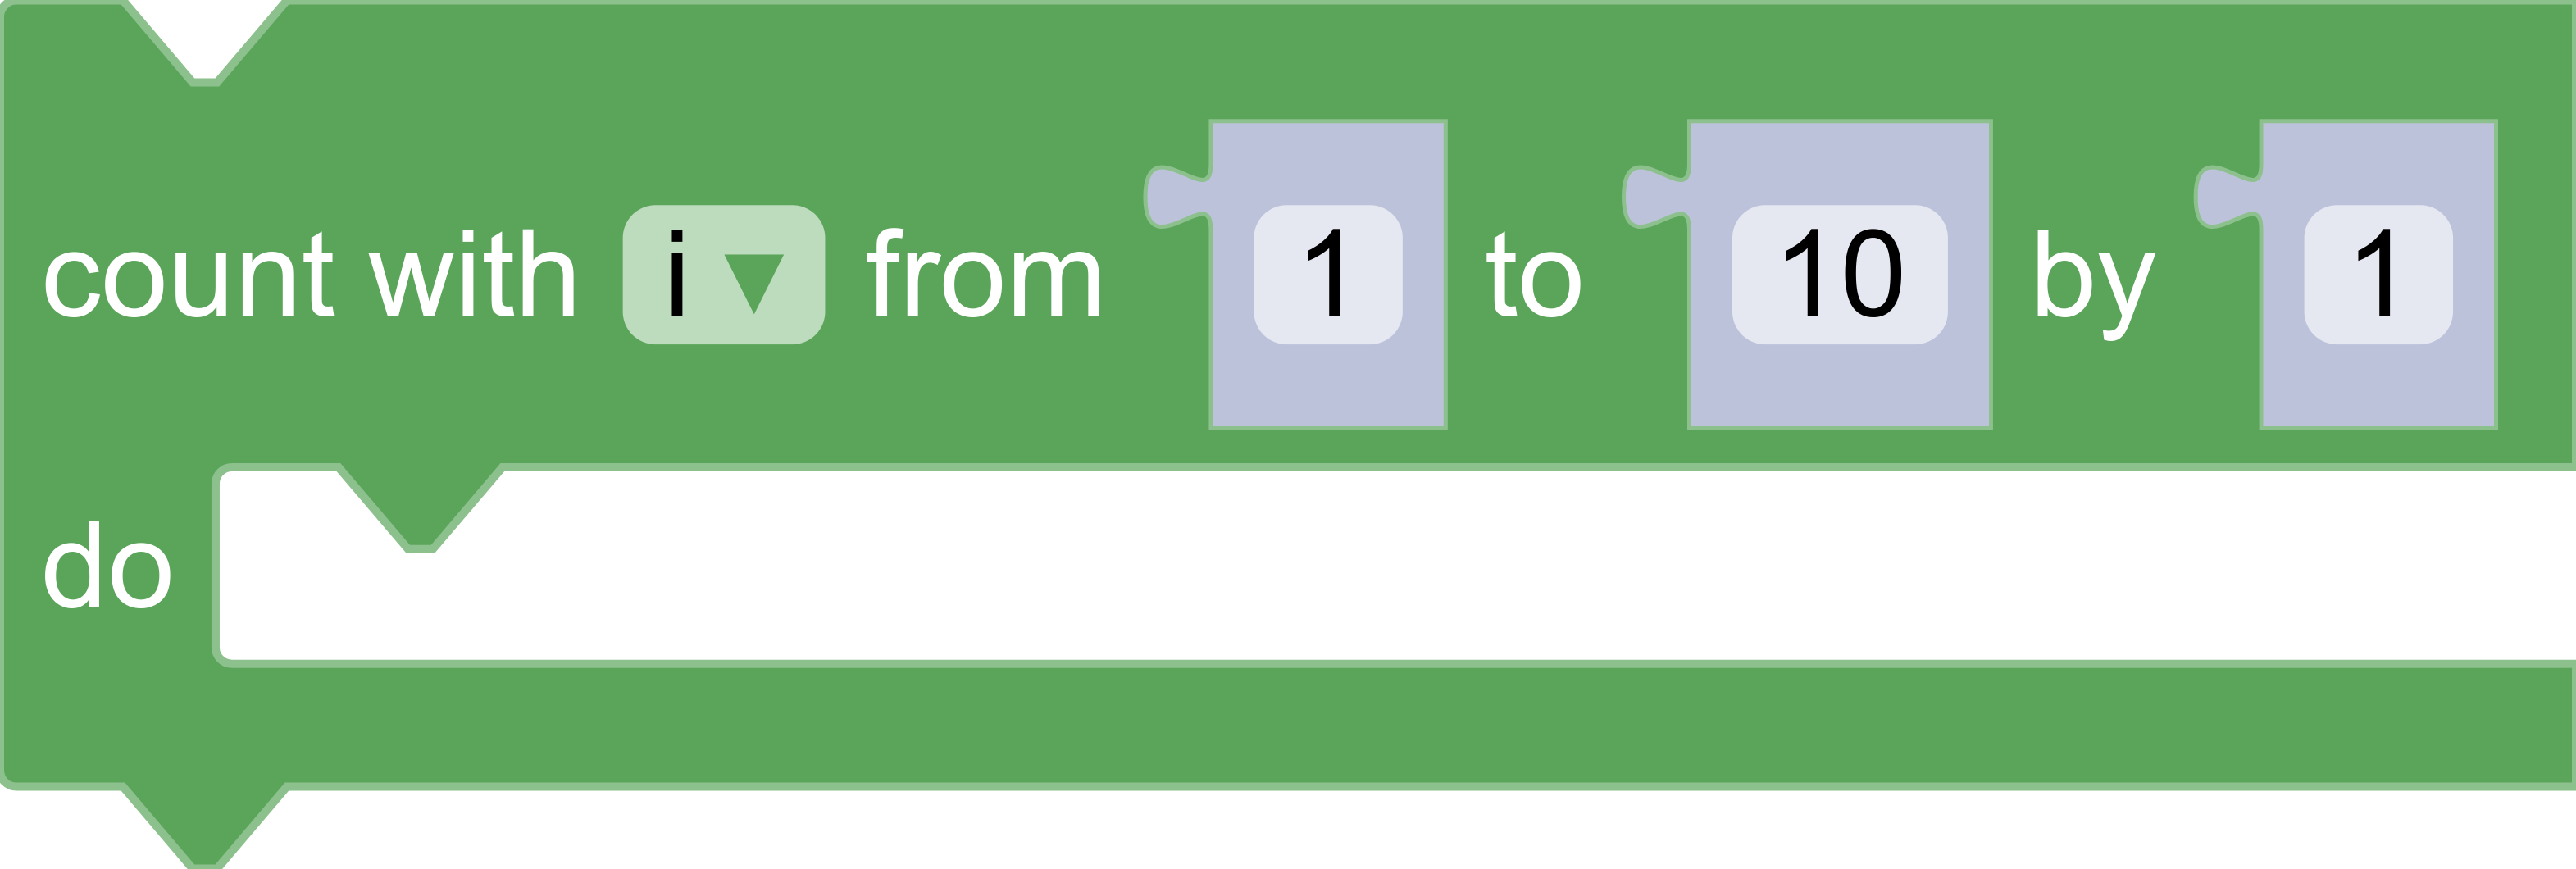
- A custom renderer which overrides the functions
Blockly.blockRendering.ConstantProvider.init()andBlockly.blockRendering.ConstantProvider.shapeFor(connection)to define and return custom SVG paths.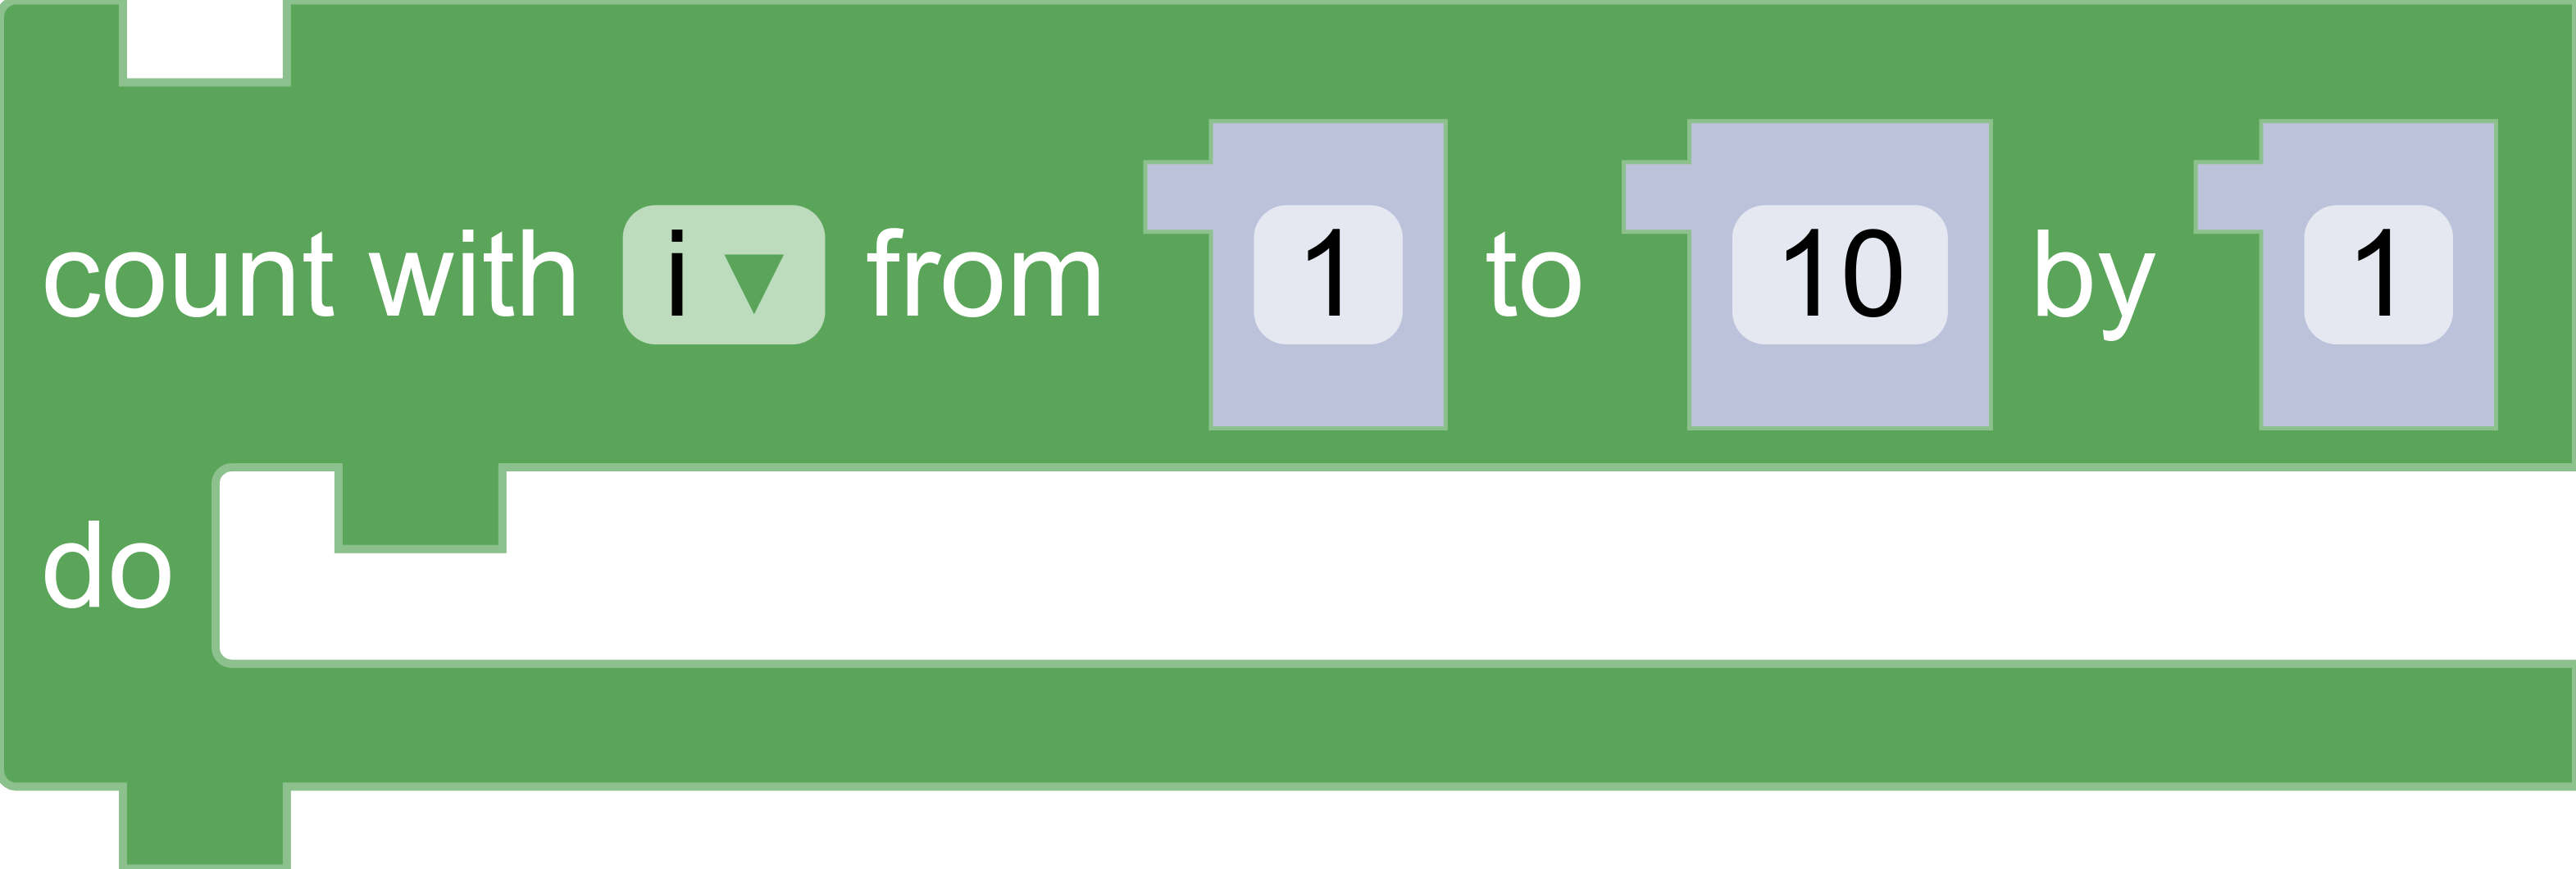
- A custom renderer which overrides the function
Blockly.blockRendering.ConstantProvider.shapeFor(connection)to return different shapes for the input/output connections depending on whether the their type is aNumber,String, orBoolean.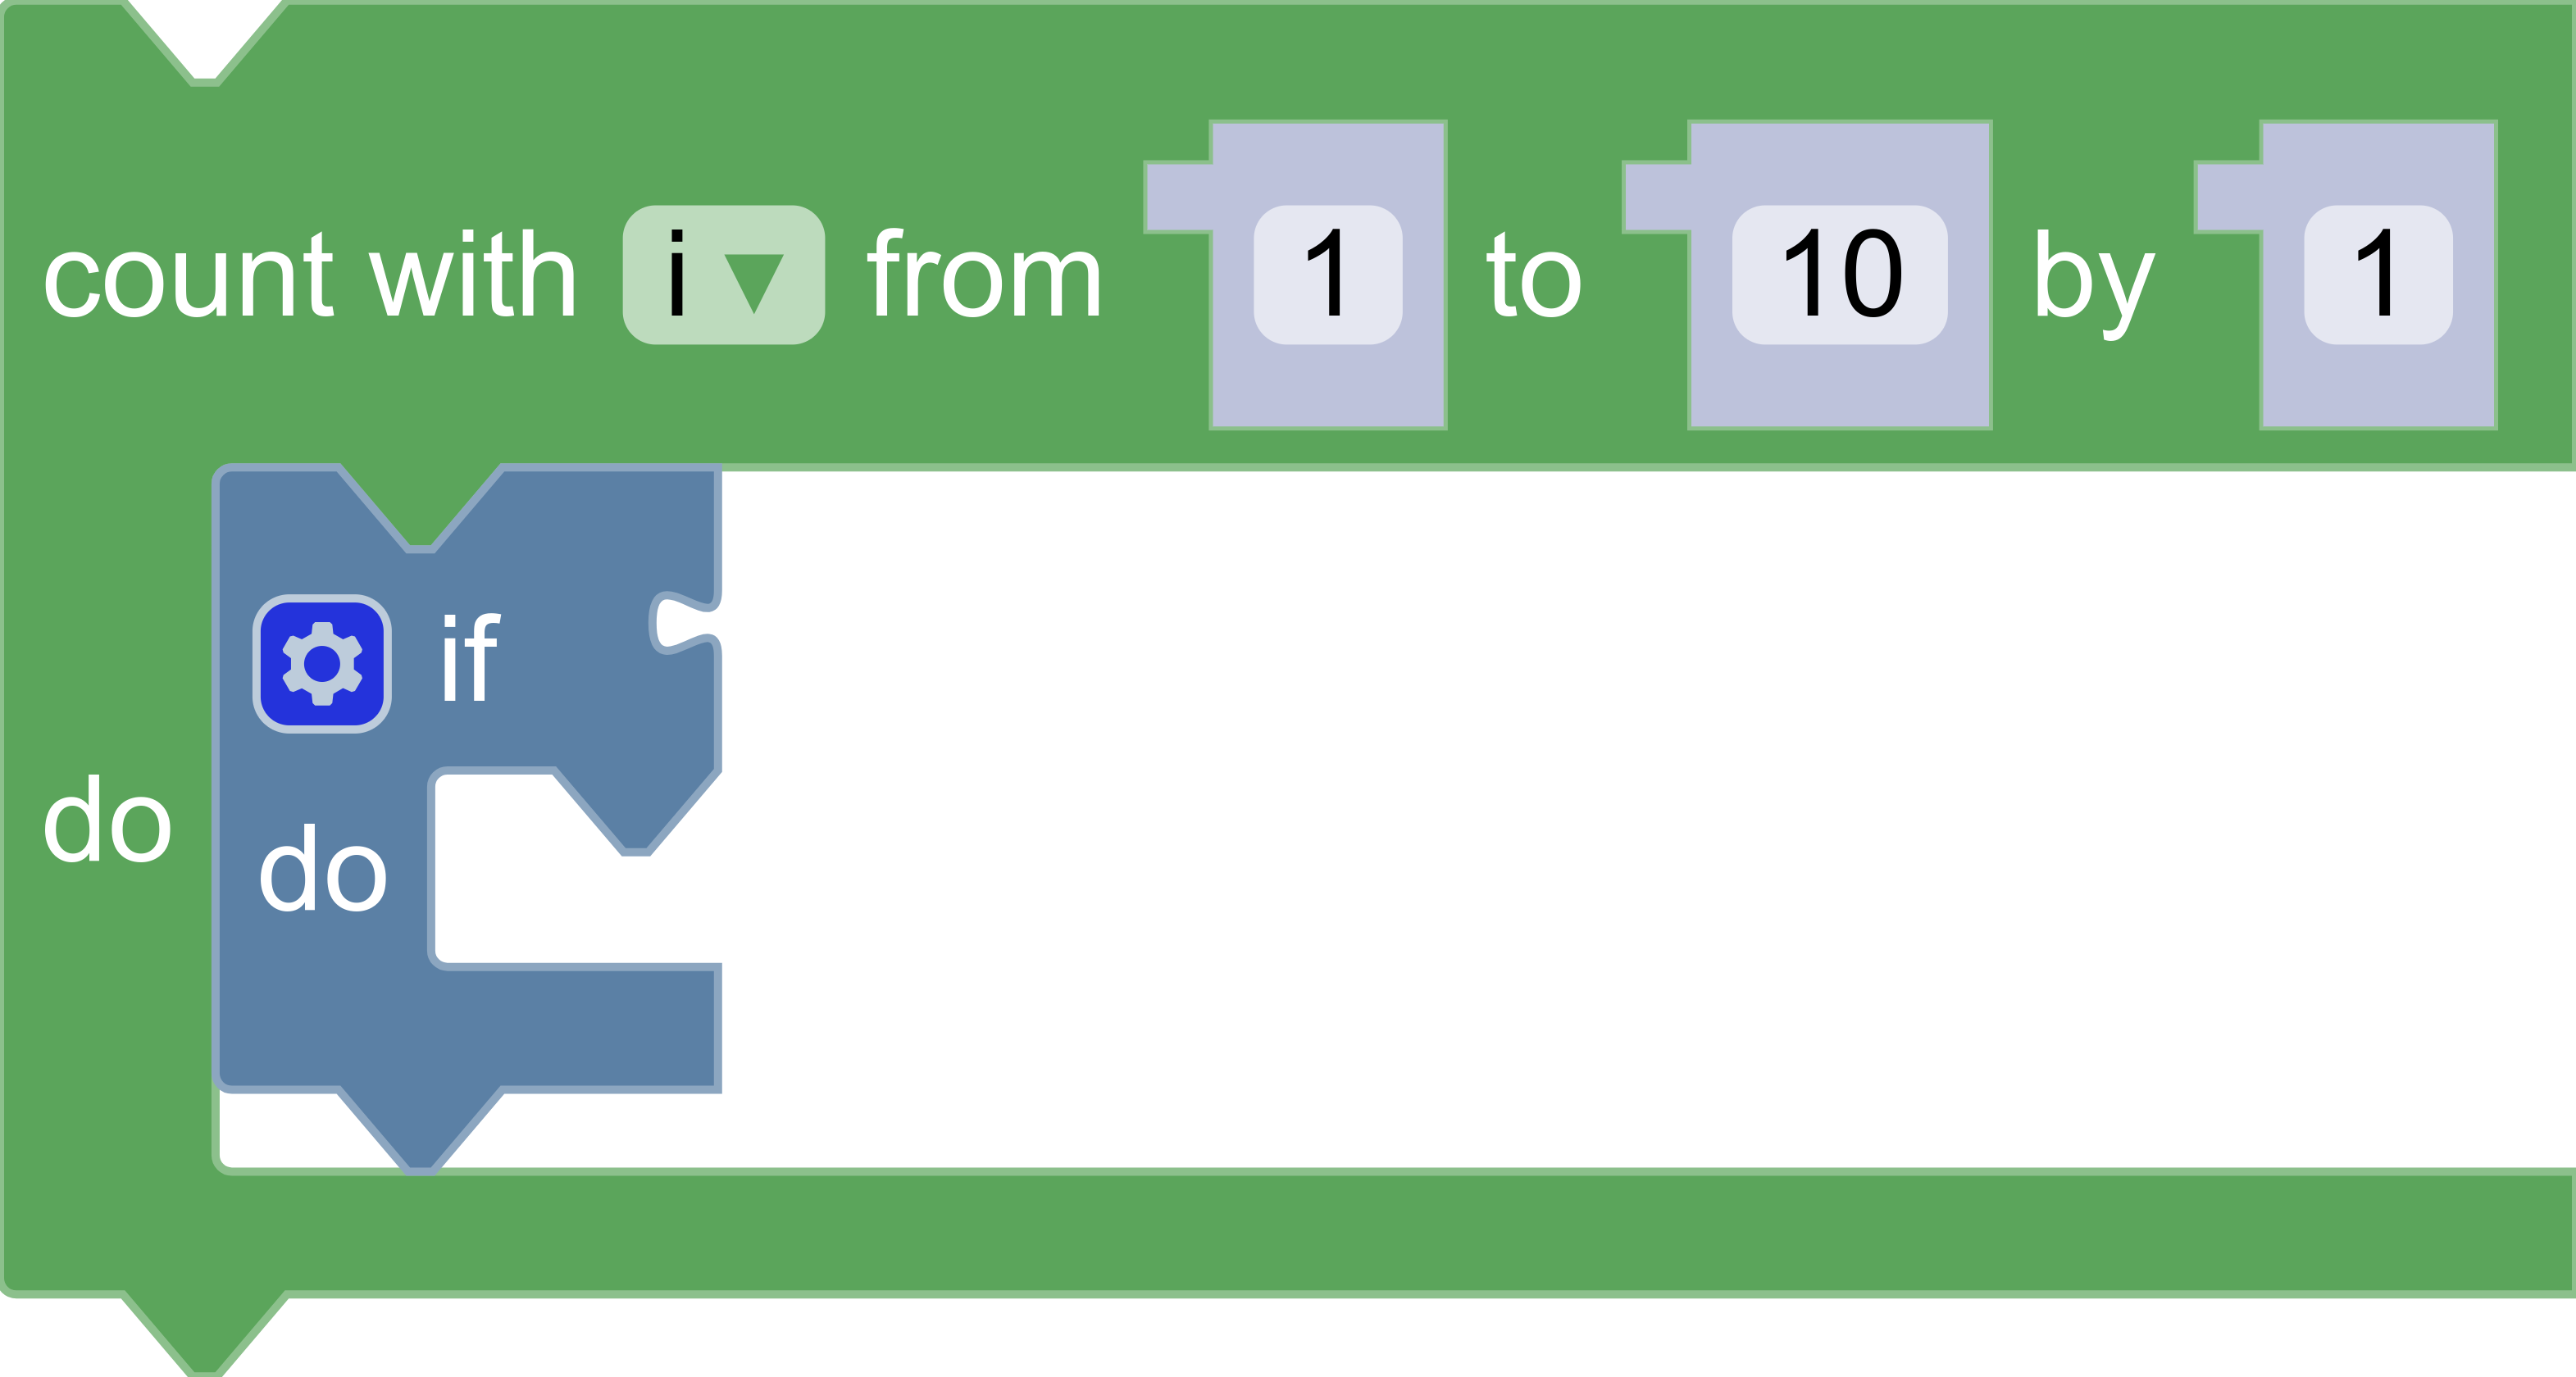
What you'll need
- Basic understanding of renderers and toolboxes in Blockly.
- NPM installed (instructions).
- Comfort using the command line/terminal.
This codelab will add code to the Blockly sample app to create and use a new custom renderer.
The application
Use the Use the npx @blockly/create-package command to create a standalone application that contains a sample setup of Blockly, including custom blocks and a display of the generated code and output.
- Run
npx @blockly/create-package app custom-renderer-codelab. This will create a blockly application in the foldercustom-renderer-codelab. cdinto the new directory:cd custom-renderer-codelab.- Run
npm startto start the server and run the sample application. - The sample app will automatically run in the browser window that opens.
The initial application uses the default renderer and contains no code or definitions for a custom renderer.
The complete code used in this codelab can be viewed in blockly-samples under examples/custom-renderer-codelab.
Before setting up the rest of the application, change the storage key used for this codelab application. This will ensure that the workspace is saved in its own storage, separate from the regular sample app, so that it doesn't interfere with other demos. In serialization.js, change the value of storageKey to some unique string. customRenderersWorkspace will work:
// Use a unique storage key for this codelab
const storageKey = 'customRenderersWorkspace';
First, visit the advanced playground to observe what the built-in renderers look like.
Click on the "Loops" entry and drag out a repeat block. Now, change the selection in the "renderer" drop down to observe the look of each built-in renderer. By default, the renderer named "Geras" is used.
A Renderer is the interface between custom rendering code and the rest of Blockly. Blockly provides a base renderer with all required fields already set to usable values.
To start, create a new directory at src/renderers and add a file inside named custom.js.
At the top of the file, import blockly/core:
import * as Blockly from 'blockly/core';
Then define a new custom renderer and have it extend the base renderer:
class CustomRenderer extends Blockly.blockRendering.Renderer {
  constructor() {
    super();
  }
}
After defining the renderer, register it with Blockly and give it the name custom_renderer:
Blockly.blockRendering.register('custom_renderer', CustomRenderer);
To use the custom renderer, import the new file at the top of src/index.js:
import './renderers/javascript';
Now, add the the renderer property into the configuration struct passed to Blockly.inject so that it now looks like this:
const ws = Blockly.inject(blocklyDiv, {
  renderer: 'custom_renderer',
  toolbox,
});
The result
If the server is already running, refresh the page to see the new changes. Otherwise, run npm start to start the server. Once the server is running, click on the Loops entry in the browser and drag out a repeat block. The resulting block will use the same values already defined in the base Blockly.blockRendering.Renderer.
A ConstantsProvider holds all rendering-related constants. This includes sizing information and colours. Blockly provides a base ConstantsProvider with all required fields set to default values.
The ConstantsProvider constructor() sets all static properties, such as NOTCH_WIDTH and NOTCH_HEIGHT. For a full list of properties, see constants.ts.
Only override the necessary subset of the constants, rather than all of them. To do so:
- Define a constants provider that extends the base
ConstantProvider. - Call the superclass
super()in theconstructor(). - Set individual properties.
Add this above the CustomRenderer definition in src/renderers/custom.js:
class CustomConstantProvider extends Blockly.blockRendering.ConstantProvider {
  constructor() {
    // Set up all of the constants from the base provider.
    super();

    // Override a few properties.
    /**
     * The width of the notch used for previous and next connections.
     * @type {number}
     * @override
     */
    this.NOTCH_WIDTH = 20;

    /**
     * The height of the notch used for previous and next connections.
     * @type {number}
     * @override
     */
    this.NOTCH_HEIGHT = 10;

    /**
     * Rounded corner radius.
     * @type {number}
     * @override
     */
    this.CORNER_RADIUS = 2;

    /**
     * The height of the puzzle tab used for input and output connections.
     * @type {number}
     * @override
     */
    this.TAB_HEIGHT = 8;
  }
}
To use the new CustomConstantProvider, override makeConstants_() inside the CustomRenderer class. Below the constructor(), add:
  /**
   * @override
   */
  makeConstants_() {
    return new CustomConstantProvider();
  }
The result
Return to the browser, click on the Loops entry, and drag out a repeat block. The resulting block should have triangular previous and next connections, and skinny input and output connections. Note that the general shapes of the connections have not changed–only parameters such as width and height.
A common use case of a custom renderer is changing the shape of connections. This requires a more detailed understanding of how a block is drawn and how SVG paths are defined.
The block outline
The outline of the block is a single SVG path. The outline is built out of many sub-paths (e.g. the path for a previous connection; the path for the top of the block; and the path for an input connection).
Each sub-path is a string of path commands that describe the appropriate shape. These commands must use relative (rather than absolute) coordinates.
SVG path commands can be written as strings, but Blockly provides a set of utility functions to make writing and reading paths easier.
init()
A connection's shape is stored as an object with information about its width, height, and sub-path. These objects are created in the ConstantProviders init() function. Here is the start of the default implementation. The complete definition can be found inside constants.ts.
/**
 * Initialize shape objects based on the constants set in the constructor.
 */
init() {
  /**
   * An object containing sizing and path information about collapsed block
   * indicators.
   */
  this.JAGGED_TEETH = this.makeJaggedTeeth();

  /** An object containing sizing and path information about notches. */
  this.NOTCH = this.makeNotch();

  // Additional code has been removed for brevity.
}
Properties that are primitives should be set in the
constructor()
, while objects should be set in
init(). This separation allows a subclass to override a constant such as NOTCH_WIDTH and see the change reflected in objects that depend on the constant.
shapeFor(connection)
The shapeFor(connection) function maps from connection to connection shape. Here is the default implementation, which can be found inside constants.ts. It returns a puzzle tab for input/output connections and a notch for previous/next connections:
/**
 * Get an object with connection shape and sizing information based on the
 * type of the connection.
 *
 * @param connection The connection to find a shape object for
 * @returns The shape object for the connection.
 */
shapeFor(connection: RenderedConnection): Shape {
  switch (connection.type) {
    case ConnectionType.INPUT_VALUE:
    case ConnectionType.OUTPUT_VALUE:
      return this.PUZZLE_TAB;
    case ConnectionType.PREVIOUS_STATEMENT:
    case ConnectionType.NEXT_STATEMENT:
      return this.NOTCH;
    default:
      throw Error('Unknown connection type');
  }
}
This step will define and use new shapes for previous/next connections and input/output connections. This takes three steps:
- Define new shape objects.
- Override
init()to store the new shape objects. - Override
shapeFor(connection)to return the new objects.
Define a previous/next connection shape
An outline path is drawn clockwise around the block, starting at the top left. As a result the previous connection is drawn from left-to-right, while the next connection is drawn from right-to-left.
Previous and next connections are defined by the same object. The object has four properties:
width: The width of the connection.height: The height of the connection.pathLeft: The sub-path that describes the connection when drawn from left-to-right.pathRight: The sub-path that describes the connection when drawn from right-to-left.
Define a new function called makeRectangularPreviousConn() and put it inside the CustomConstantProvider class definition. Note that NOTCH_WIDTH and NOTCH_HEIGHT have already been overridden in the constructor(), so they'll be reused:
  /**
   * @returns Rectangular notch for use with previous and next connections.
   */
  makeRectangularPreviousConn() {
    const width = this.NOTCH_WIDTH;
    const height = this.NOTCH_HEIGHT;

    /**
     * Since previous and next connections share the same shape you can define
     * a function to generate the path for both.
     *
     * @param dir Multiplier for the horizontal direction of the path (-1 or 1)
     * @returns SVGPath line for use with previous and next connections.
     */
    function makeMainPath(dir) {
      return Blockly.utils.svgPaths.line(
          [
            Blockly.utils.svgPaths.point(0, height),
            Blockly.utils.svgPaths.point(dir * width, 0),
            Blockly.utils.svgPaths.point(0, -height),
          ]);
    }
    const pathLeft = makeMainPath(1);
    const pathRight = makeMainPath(-1);

    return {
      width: width,
      height: height,
      pathLeft: pathLeft,
      pathRight: pathRight,
    };
  }
Define an input/output connection shape
Just as previous/next connection shapes are drawn from left-to-right and right-to-left, input/output connection shapes are drawn from top-to-bottom and bottom-to-top.
Input and output connections are defined by the same object. The object has four properties:
width: The width of the connection.height: The height of the connection.pathUp: The sub-path that describes the connection when drawn from top-to-bottom.pathDown: The sub-path that describes the connection when drawn from bottom-to-top.
Define a new function called makeRectangularInputConn() and put it inside the CustomConstantProvider class definition. Note that TAB_WIDTH and TAB_HEIGHT have already been overridden in the constructor() so they'll be reused:
  /**
   * @returns Rectangular puzzle tab for use with input and output connections.
   */
  makeRectangularInputConn() {
    const width = this.TAB_WIDTH;
    const height = this.TAB_HEIGHT;

    /**
     * Since input and output connections share the same shape you can define
     * a function to generate the path for both.
     *
     * @param dir Multiplier for the vertical direction of the path (-1 or 1)
     * @returns SVGPath line for use with input and output connections.
     */
    function makeMainPath(dir) {
      return Blockly.utils.svgPaths.line(
          [
            Blockly.utils.svgPaths.point(-width, 0),
            Blockly.utils.svgPaths.point(0, dir * height),
            Blockly.utils.svgPaths.point(width, 0),
          ]);
    }
    const pathUp = makeMainPath(-1);
    const pathDown = makeMainPath(1);

    return {
      width: width,
      height: height,
      pathUp: pathUp,
      pathDown: pathDown,
    };
  }
Override init()
Override the init() function in the CustomConstantProvider class definition and store the new shape objects as RECT_PREV_NEXT and RECT_INPUT_OUTPUT. Make sure to call the superclass init() function to store other objects that have not been overridden.
  /**
   * @override
   */
  init() {
    // First, call init() in the base provider to store the default objects.
    super.init();

    // Add calls to create shape objects for the new connection shapes.
    this.RECT_PREV_NEXT = this.makeRectangularPreviousConn();
    this.RECT_INPUT_OUTPUT = this.makeRectangularInputConn();
  }
Override shapeFor(connection)
Next, override the shapeFor(connection) function in the CustomConstantProvider class definition and return the new custom objects:
  /**
   * @override
   */
  shapeFor(connection) {
    switch (connection.type) {
      case Blockly.INPUT_VALUE:
      case Blockly.OUTPUT_VALUE:
        return this.RECT_INPUT_OUTPUT;
      case Blockly.PREVIOUS_STATEMENT:
      case Blockly.NEXT_STATEMENT:
        return this.RECT_PREV_NEXT;
      default:
        throw Error('Unknown connection type');
    }
  }
The result
Return to the browser, click on the Loops entry, and drag out a repeat block. The resulting block should have rectangular connections for all four connection types.
This step will create a renderer that sets connection shapes at runtime based on a connection's type checks. It will use the default connection shapes and the shapes defined in the previous steps.
Override shapeFor(connection)
Override the shapeFor(connection) function in the CustomConstantProvider class definition to return a different connection shape based on the checks returned from connection.getCheck(). Note the previous definition of shapeFor(connection) created in previous steps will need to be deleted.
The new definition of shapeFor(connection) will:
- Return a rectangular tab for inputs and outputs that accept
Numbers andStrings. - Return the default puzzle tab for all other inputs and outputs.
- Return the normal notch for all previous and next connections.
/**
 * @override
 */
shapeFor(connection) {
  var checks = connection.getCheck();
  switch (connection.type) {
    case Blockly.INPUT_VALUE:
    case Blockly.OUTPUT_VALUE:
      if (checks && checks.includes('Number')) {
        return this.RECT_INPUT_OUTPUT;
      }
      if (checks && checks.includes('String')) {
        return this.RECT_INPUT_OUTPUT;
      }
      return this.PUZZLE_TAB;
    case Blockly.PREVIOUS_STATEMENT:
    case Blockly.NEXT_STATEMENT:
      return this.NOTCH;
    default:
      throw Error('Unknown connection type');
  }
The result
Take these steps to fully test this change in the browser:
- Click on the
Loopsentry and drag out a repeat block. - Click on the
Logicentry and drag the conditionalifblock into the repeat block that was placed on the workspace in the previous step.
There should be an entry similar to the screenshot below, in which the Number inputs and outputs are rectangular, but the boolean input on the if block is a puzzle tab.
Custom renderers are a powerful way to change the look and feel of Blockly. In this codelab you learned:
- How to declare and register a custom renderer by extending
Blockly.blockRendering.Renderer. - How to override renderer constants such as
NOTCH_HEIGHTinBlockly.blockRendering.ConstantProvider. - How to modify connection shapes by creating custom SVG paths, storing them in
init(), and finally returning them inshapeFor(connection). - How to update the mapping from connection to connection shape by adding logic in
shapeFor(connection).